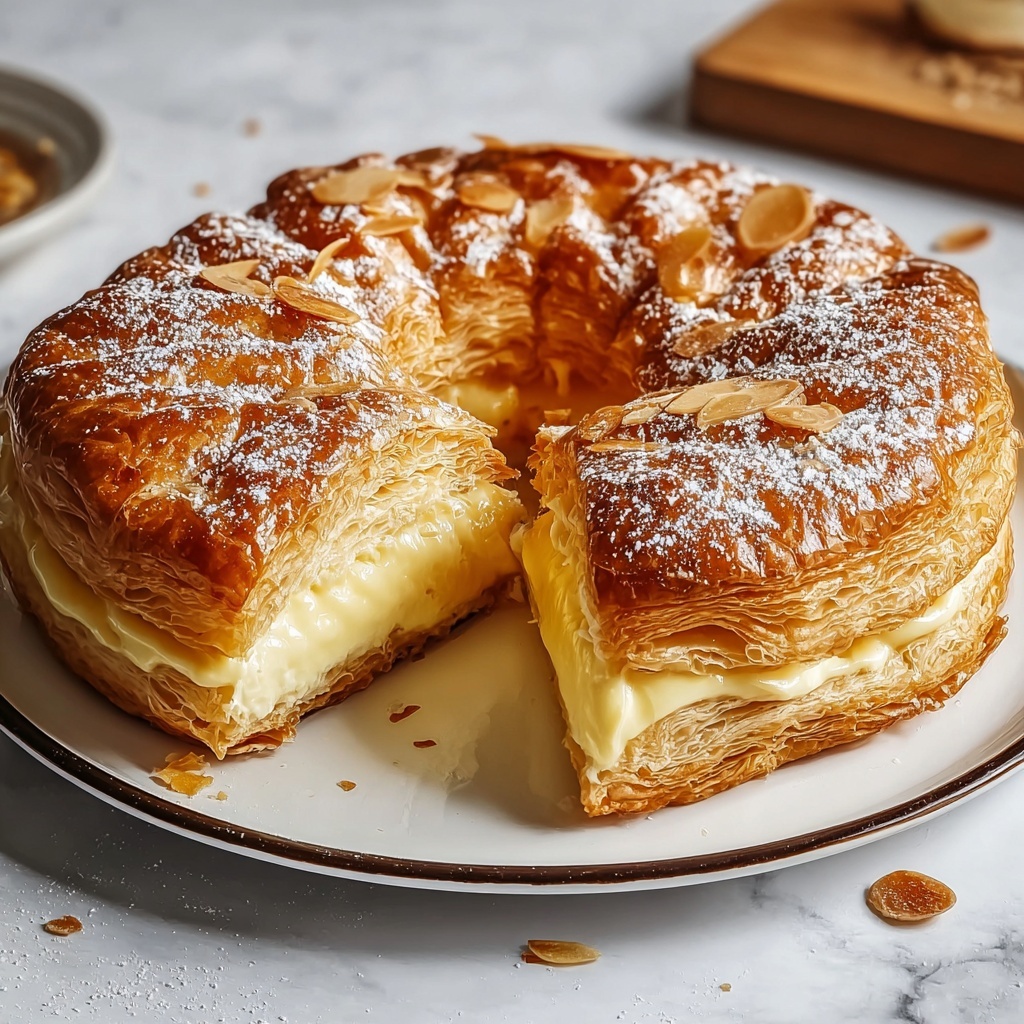
If you love the tender, slightly sweet softness of King’s Hawaiian bread combined with the rich, creamy delight of cheesecake, then you are going to fall head over heels for this King’s Hawaiian Cheesecake Danish Recipe. It takes the familiar comfort of King’s Hawaiian dough and elevates it with a luscious cream cheese filling that’s tangy, smooth, and gently sweetened, baked to golden perfection. This recipe is a wonderful treat whether for breakfast, brunch, or anytime you want a bit of indulgent joy. It’s straightforward to make, impressive to serve, and has that perfect blend of textures and flavors that keep you coming back for more.

Ingredients You’ll Need
Gathering these simple yet vital ingredients is your first step toward creating a masterpiece. Each one plays a crucial role, from the rich creaminess of the cream cheese to the tender sweetness of the King’s Hawaiian dough, coming together to deliver the perfect balance of flavor and texture.
- King’s Hawaiian bread dough: The soft, sweet base that gives this Danish its signature pillowy texture.
- Cream cheese: Provides the smooth, tangy richness essential for the cheesecake filling.
- Sugar: Sweetens the filling just enough to complement but not overpower.
- Vanilla extract: Adds a warm, fragrant note to elevate the flavor complexity.
- Lemon juice: Gives a subtle brightness to balance the richness of the cream cheese.
- Salt: Enhances all the flavors and cuts through the sweetness slightly.
- Heavy cream: Contributes to a silky and luscious filling texture.
- Large egg: Binds the filling together for a creamy consistency.
- Butter: Used for both greasing and brushing to achieve a golden, glossy finish.
- Milk: Helps thin the filling mixture slightly for perfect spreadability.
- All-purpose flour: Adds structure to the filling so it sets just right when baked.
How to Make King’s Hawaiian Cheesecake Danish Recipe
Step 1: Prepare Your Oven and Baking Sheet
Begin by preheating your oven to 350°F (175°C). This ensures a steady temperature for even baking from the start. Lightly grease your baking sheet with butter or a bit of cooking spray to prevent sticking and encourage a golden bottom crust.
Step 2: Roll Out the Dough
On a clean work surface, roll out the King’s Hawaiian bread dough to about 1/4-inch thickness. Keep it gentle and even so the dough cooks perfectly without getting too thick or thin in spots.
Step 3: Shape and Cut the Dough
Use your rolling pin to shape the dough into a neat rectangle sized to fit your baking sheet. Then cut the dough into squares roughly 4-6 inches per side—perfect portions for these delightful Danish treats.
Step 4: Position the Squares and Prepare Filling
Place the dough squares on your greased baking sheet, leaving a little room between each to allow for rising and folding. Meanwhile, make the filling by combining cream cheese, sugar, vanilla extract, lemon juice, and salt in a medium bowl. Whisk until smooth and creamy.
Step 5: Finish the Filling
Slowly mix in the heavy cream, continuing to beat until luscious and combined. Add the egg for binding and finish with a smooth blend of flour and milk. This ensures your filling will hold together perfectly after baking.
Step 6: Butter and Fill the Danish
Melt your butter and brush each dough square lightly to add richness and a golden finish. Spoon a generous amount of the cream cheese filling into the center of each square—you don’t want to be shy here, as this is the star of the show!
Step 7: Fold and Shape
Carefully bring the corners of each dough square together over the filling to create a charming little pocket or tart shape. This step might require a gentle touch, but it’s worth the effort for that beautiful presentation.
Step 8: Bake to Perfection
Place the baking sheet in your preheated oven and bake the Danish for 18-22 minutes until they turn a gorgeous golden brown and the filling is just set.
Step 9: Final Butter Touch
While baking, melt a little extra butter. Once your Danish come out of the oven, brush the tops immediately with this butter to give a shiny, rich finish that elevates the flavor even more.
Step 10: Cool and Enjoy
Allow the Danish to cool for 5-10 minutes for the filling to settle slightly, then savor your homemade King’s Hawaiian Cheesecake Danish Recipe while still warm to enjoy that perfect balance of flavors and textures.
How to Serve King’s Hawaiian Cheesecake Danish Recipe
Garnishes
Sprinkle a light dusting of powdered sugar or a few fresh berries on top to add a pop of color and subtle sweetness. A drizzle of honey or a thin glaze made with lemon juice and powdered sugar can also enhance the Danish’s glossy finish beautifully.
Side Dishes
Pair your Danish with a fresh cup of coffee or a fruity tea to complement the rich cream cheese flavor. A side of fresh fruit like strawberries, blueberries, or sliced mango adds a refreshing contrast and makes for a balanced breakfast or brunch spread.
Creative Ways to Present
Arrange several King’s Hawaiian Cheesecake Danish Recipe servings on a rustic wooden board with small bowls of yogurt, nuts, and honey for a customizable brunch platter. You can also serve them alongside a dollop of whipped cream or flavored mascarpone for an extra indulgent touch.
Make Ahead and Storage
Storing Leftovers
Store any leftover Danish in an airtight container at room temperature for up to 2 days or refrigerate for up to 5 days to keep them fresh. Make sure they are completely cool before sealing to avoid condensation making the crust soggy.
Freezing
You can freeze unbaked shaped Danish on a baking sheet until firm, then transfer them to a freezer-safe bag or container. When ready to enjoy, bake them straight from frozen, adding a few extra minutes to the baking time for a fresh-baked feel anytime you want.
Reheating
Warm leftover Danish gently in a preheated oven at 300°F (150°C) for about 5-7 minutes. This will bring back their delightful flakiness and perfectly warm filling without drying them out like a microwave might.
FAQs
Can I use store-bought King’s Hawaiian bread instead of bread dough?
While using fresh store-bought King’s Hawaiian bread slices won’t give you the same dough texture, you could experiment by slicing and using them as a base, but the traditional dough ensures the fluffiest Danish with that signature golden crust.
Is it possible to make this recipe dairy-free?
Yes! You can substitute cream cheese, heavy cream, butter, and milk with their dairy-free alternatives like vegan cream cheese, coconut cream, vegan butter, and plant-based milk to make a delicious dairy-free version.
Can I prepare the filling ahead of time?
The cream cheese filling can be made a day in advance and stored in the refrigerator. Just give it a good stir before filling your Danish dough to ensure a smooth consistency.
How sweet is this King’s Hawaiian Cheesecake Danish Recipe?
It has a balanced sweetness thanks to the natural sweetness of the King’s Hawaiian dough and the modest amount of sugar in the filling—perfect for those who prefer their desserts not overly sweet but still satisfyingly indulgent.
What’s the best way to serve these Danishes for a brunch party?
Serve them warm on a large platter with a variety of toppings and sides such as fresh fruit, yogurt, and spreads to allow guests to customize their bites. Pairing with coffee, tea, or sparkling juice makes for a festive presentation.
Final Thoughts
Now that you’ve got the inside scoop on the King’s Hawaiian Cheesecake Danish Recipe, I encourage you to dive in and create this irresistibly charming treat yourself. It’s genuinely a crowd-pleaser with its perfect harmony of soft, sweet bread and creamy cheesecake filling. Whether for a special occasion or just because, these Danishes are sure to brighten up any table and warm hearts. Happy baking!