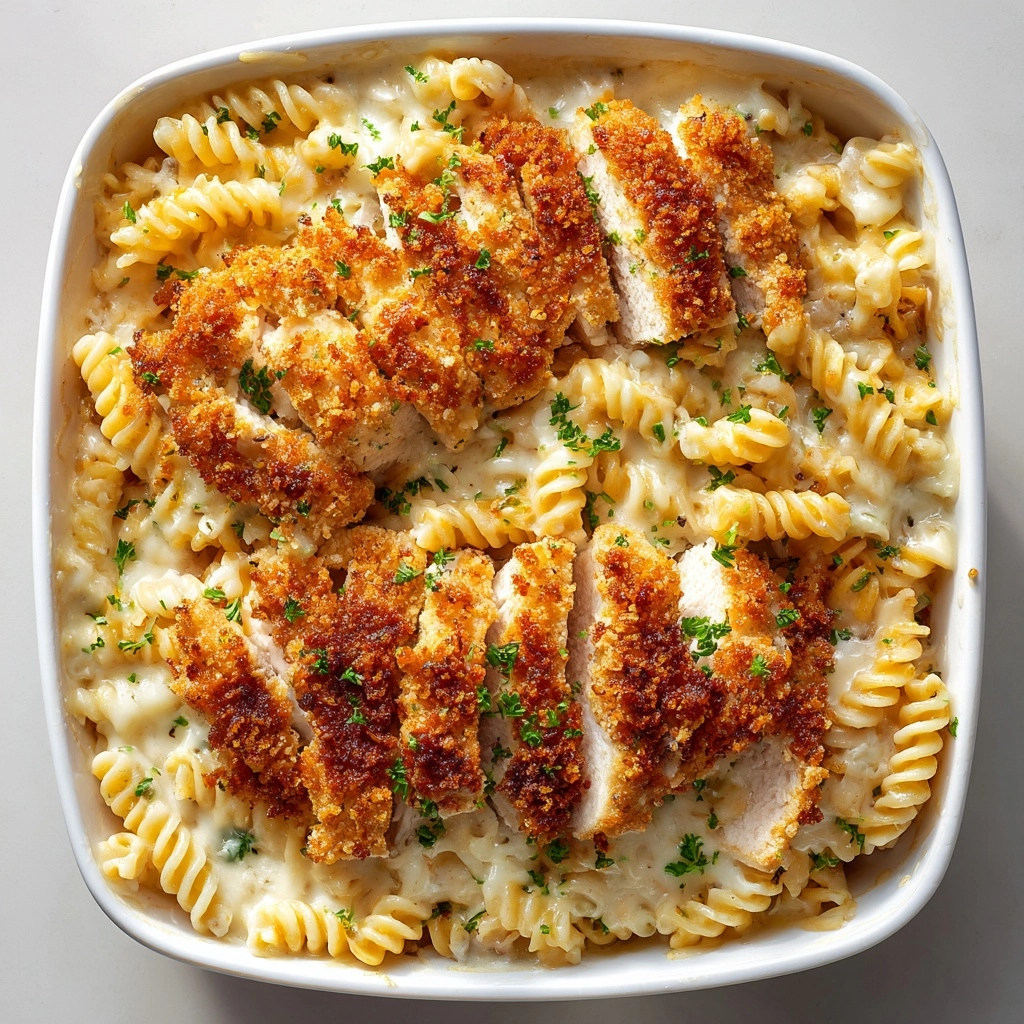
Get ready to fall in love with a cozy, comforting dinner that never fails to impress: Creamy Garlic Parmesan Chicken Pasta Bake. Imagine perfectly cooked penne smothered in a luscious, garlicky Parmesan cream sauce, loaded with juicy chicken and topped with a golden layer of bubbling cheese. It’s that weeknight hero you crave whenever you want something easy, hearty, and family-approved – a dish bursting with savory flavors and a texture so satisfying you’ll have everyone going back for seconds!
Ingredients You’ll Need
For this Creamy Garlic Parmesan Chicken Pasta Bake, simplicity meets decadence. Each ingredient has a purpose, whether it’s building the silkiest sauce, adding crispy texture, or delivering that irresistible cheesy finish. Here’s why you’ll want every single one:
- Penne Pasta: Sturdy and tubular, penne soaks up every drop of sauce for the perfect creamy bite.
- Olive Oil: The flavorful foundation for browning chicken and sautéing garlic to aromatic perfection.
- Boneless Skinless Chicken Breast: Tender, juicy bites of protein keep the bake hearty and satisfying.
- Garlic: Four cloves bring out bold, savory flavor that’s truly the backbone of this pasta bake.
- Butter: Adds rich flavor and helps create a creamy roux for the sauce.
- All-Purpose Flour: Thickens the sauce just enough to cling to every strand of pasta.
- Whole Milk: Lends a light creaminess for a luscious, but not overly heavy, sauce.
- Heavy Cream: Brings silky, decadent texture to the creamy sauce.
- Grated Parmesan Cheese: Salty, nutty, and essential for that classic Italian flavor.
- Italian Seasoning: A blend of herbs gives the dish its distinctly savory, aromatic profile.
- Salt: Highlights all the flavors and balances the creamy sauce.
- Black Pepper: Brings a gentle heat and complexity to round out the flavor.
- Shredded Mozzarella Cheese: Melts into a bubbly, golden crust that’s absolutely irresistible.
- Chopped Fresh Parsley (optional): Sprinkled at the end for a burst of color and garden-fresh flavor.
How to Make Creamy Garlic Parmesan Chicken Pasta Bake
Step 1: Cook the Pasta
Start by preheating your oven to 375°F (190°C). Bring a generous pot of salted water to a boil and cook the penne pasta until it’s just al dente—don’t overcook, since the noodles will finish baking in the oven. Drain and set aside while you prepare the rest of the dish. This step ensures the pasta holds its shape and texture in the final bake.
Step 2: Sauté the Chicken
In a large skillet over medium heat, add the olive oil. Toss in the chicken pieces and cook, turning occasionally, until all sides are golden and the centers are cooked through, about 5 to 7 minutes. Remove the cooked chicken from the pan and set aside. These juicy, flavorful bits will become the star protein throughout your Creamy Garlic Parmesan Chicken Pasta Bake.
Step 3: Make the Creamy Garlic Parmesan Sauce
In the same skillet, melt the butter and stir in the minced garlic. Sauté for about 1 minute, just until the garlic smells fragrant and you can hardly resist sneaking a taste! Sprinkle in the flour and cook, stirring constantly, for 1 to 2 minutes to form a roux. Gradually pour in the milk and heavy cream, whisking the mixture as it begins to thicken. Let it simmer for 3 to 4 minutes until silky and smooth.
Step 4: Add Cheese and Seasonings
Time for the flavor explosion: Add the grated Parmesan cheese, Italian seasoning, salt, and black pepper right into the simmering sauce. Stir until the cheese melts completely and a rich, creamy sauce develops. This step transforms your skillet into a savory, cheesy dream and sets your Creamy Garlic Parmesan Chicken Pasta Bake apart from any other pasta casserole.
Step 5: Combine Everything
Add both the cooked chicken and drained pasta directly to the sauce in the skillet. Gently toss to coat every piece evenly, making sure no bite is left without plenty of that gooey, garlicky Parmesan goodness. Transfer the entire mixture to a greased 9×13-inch baking dish, smoothing it out evenly for uniform baking.
Step 6: Add the Cheesy Topping and Bake
Sprinkle shredded mozzarella cheese over the top for the ultimate melty crust. Slide the dish into your preheated oven and bake for 20 to 25 minutes, until the cheese is bubbly and golden. If you love an extra-crispy top, switch on the broiler for 1 or 2 minutes at the end, keeping a close eye to avoid burning. Remove from the oven, let it rest a few minutes, then finish with a scatter of fresh parsley for a pop of color and freshness.
How to Serve Creamy Garlic Parmesan Chicken Pasta Bake

Garnishes
A sprinkle of chopped fresh parsley is the classic finish, adding color and a touch of brightness that balances out the hearty sauce. For even more Italian flair, shave a little extra Parmesan cheese on top or dust with freshly cracked black pepper before serving. These little touches make your Creamy Garlic Parmesan Chicken Pasta Bake look and taste restaurant-worthy!
Side Dishes
This pasta bake pairs wonderfully with a crisp green salad tossed in a light vinaigrette—perfect for cutting through all that rich, cheesy goodness. Garlic bread or warm, crusty baguette is another winning choice, ideal for soaking up every last bit of the creamy sauce. If you want to sneak in more veggies, serve roasted broccoli, green beans, or a medley of oven-roasted vegetables alongside.
Creative Ways to Present
For a memorable presentation, scoop the Creamy Garlic Parmesan Chicken Pasta Bake into individual ramekins for personal-sized portions that look adorable on the table. Garnish each with a twist of fresh parsley and a dusting of Parmesan. Or, serve it family-style in a beautiful ceramic baking dish, letting everyone dig in for that perfect, cheesy scoop.
Make Ahead and Storage
Storing Leftovers
Leftover Creamy Garlic Parmesan Chicken Pasta Bake keeps beautifully! Let the casserole cool to room temperature, then cover tightly or transfer to an airtight container. It’ll stay fresh in the refrigerator for up to 3 days—perfect for quick lunches or next-day dinners.
Freezing
To freeze, assemble the dish up to the point of baking, wrap tightly with plastic wrap and aluminum foil, and freeze for up to 2 months. When you’re ready to enjoy, thaw overnight in the fridge and bake as directed, adding a few extra minutes if needed. Freezing before baking helps preserve the creamy texture and keeps the pasta from getting too soft.
Reheating
For best results, reheat leftovers in a 350°F oven, covered with foil, for about 20 minutes or until hot throughout. You can also warm individual portions in the microwave, adding a splash of milk or cream if the pasta seems dry to bring back its original creamy texture. A quick broil at the end revives that crisp, melty cheese topping!
FAQs
Can I use different pasta shapes?
Absolutely! While penne works wonders, you can swap in rotini, rigatoni, or even fusilli—just be sure to cook the pasta al dente so it holds up during baking.
How do I make this gluten-free?
Simply use your favorite gluten-free pasta and swap the all-purpose flour for a gluten-free blend. The results are just as creamy and satisfying as the original!
Is it possible to add vegetables?
Definitely! Steamed broccoli, spinach, sautéed mushrooms, or even peas can be mixed into the sauce along with the chicken and pasta for extra color and nutrition. The more veggies, the merrier!
Can I use precooked or rotisserie chicken?
Yes! Rotisserie or leftover cooked chicken is a fantastic shortcut. Just mix it into the cream sauce with the pasta and skip the step of browning the chicken from scratch.
What’s the best way to reheat this pasta bake?
For the best cheesy, creamy results, reheat in the oven at 350°F, covered with foil. For a quick fix, the microwave works too—just add a splash of milk and cover loosely to prevent drying out.
Final Thoughts
If you’re on the hunt for a crowd-pleasing, comforting dinner that’s easy enough for weeknights but delicious enough for Sunday suppers, give this Creamy Garlic Parmesan Chicken Pasta Bake a spot on your menu. It’s the kind of dish that brings people together and leaves everyone smiling, bite after creamy, cheesy bite. Try it—you’ll want to make it again and again!