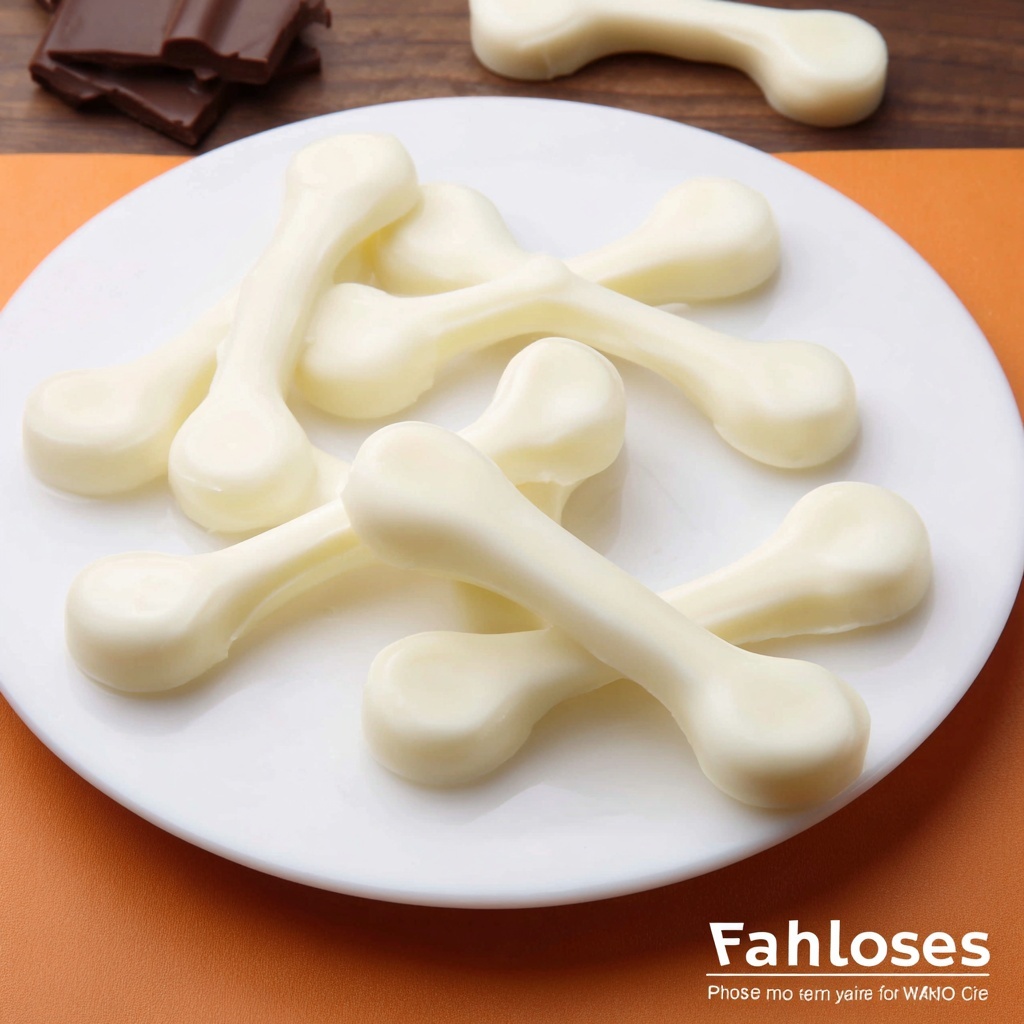
If you’re looking for a fun, elegant, and utterly delightful treat to impress friends or simply enjoy as a whimsical snack, this Chocolate Wishbones Recipe is the perfect confection to try. With just white chocolate and a little bit of simple shaping, you’ll create charming edible wishbones that are crisp, creamy, and absolutely melt-in-your-mouth heavenly. These little delights are as playful as they are delicious, and once you try making them, you’ll wonder why you never thought of wishbones made of chocolate before!
Ingredients You’ll Need
Getting started with this Chocolate Wishbones Recipe is a breeze because you only need a few ingredients that work hand in hand to create a smooth, glossy texture and a sweet, creamy flavor. Each component plays an important role in making the wishbones sturdy yet delicate enough to snap apart later.
- White Chocolate Wafers/Melts/Bark: These melt beautifully and set with a glossy finish, perfect for forming your wishbones.
- Sandwich size baggie: Acts as your piping tool once you snip the corner, giving you control over shaping each wishbone.
- Parchment paper: Provides a non-stick surface to craft your chocolate wishbones easily and keep them intact.
How to Make Chocolate Wishbones Recipe
Step 1: Prepare Your Workspace and Melt the Chocolate
Start by lining a cookie sheet with parchment paper to keep your wishbones from sticking. Place your white chocolate wafers in a microwave-safe bowl, then heat for 30 seconds and stir. Repeat heating in short bursts and stirring in between until the chocolate is smoothly melted and ready to pipe. Taking your time here ensures a glossy melt that sets perfectly.
Step 2: Fill Your Piping Bag
Transfer the melted chocolate into a sandwich bag. Snip off just the tiniest corner of the bag – cutting too much will make pouring tricky. This small opening is essential for creating clean, delicate lines when you shape each wishbone.
Step 3: Draw the Wishbone Base
Start on the cookie sheet by squeezing out a small oval shape close to the bottom corner of your parchment. Without lifting the bag, continue by drawing the left side of a heart shape branching from the oval. When you reach the height you want your wishbone to be, squirt a bit more chocolate to form another small oval at the top. This creates the base and the curve.
Step 4: Complete the Wishbone Shape
Now lift the bag and return to the bottom oval to create the right side of your wishbone, mirroring the left side. Keep the lines even and delicate, maintaining that classic wishbone arch. The precision here gives your treat a charming, recognizable structure.
Step 5: Chill and Set the Wishbones
Pop the cookie sheet into the fridge for 3 to 5 minutes. Chilling hardens the chocolate so your wishbones hold their shape perfectly and have a crisp snap once they’re ready to be enjoyed. After they’re set, they’re ready to share or store!
How to Serve Chocolate Wishbones Recipe
Garnishes
While these wishbones shine on their own, you can add a sprinkle of edible glitter or dust with cocoa powder to make them even more special. Tiny sugar sprinkles or a drizzle of dark chocolate over the white can add a lovely contrast and an extra touch of sweetness and sophistication.
Side Dishes
Chocolate Wishbones make a charming accompaniment to a light fruit salad, a scoop of vanilla ice cream, or a cup of hot coffee or tea. Their delicate sweetness complements fresh berries or a tart citrus dessert beautifully, balancing flavors and textures on your table.
Creative Ways to Present
Try placing these chocolate wishbones standing inside clear glass jars for a festive look or attach them to the rim of dessert glasses as decoration. They are also fantastic as edible gift toppers or nestled on miniature dessert plates alongside cupcakes or mousse cups for an elegant finish.
Make Ahead and Storage
Storing Leftovers
If you find yourself with extra wishbones, store them in an airtight container at room temperature away from heat and sunlight. This keeps them crisp and flaky for several days, so you can enjoy that snap any time.
Freezing
Although these are best enjoyed fresh, you can freeze chocolate wishbones by placing them in a single layer on parchment paper and transferring to a freezer-safe container. Thaw gently at room temperature before serving to preserve their texture and shine.
Reheating
Since these are meant to be enjoyed as cooled bites, reheating isn’t necessary. In fact, exposing them to heat will melt their shape. It’s better to serve them slightly cool or at room temperature.
FAQs
Can I use milk or dark chocolate instead of white chocolate for this Chocolate Wishbones Recipe?
Absolutely! Milk or dark chocolate melts just as well and will give you a different flavor profile. Just be aware that white chocolate sets with a distinctive creamy color, while darker chocolates will create deeper, richer wishbones.
What’s the best way to make sure my wishbones come out smooth and tidy?
Melting the chocolate gently and stirring well between short microwave bursts ensures a glossy finish. Also, use a very small snip on your baggie tip for fine control when piping the shapes.
Can I add flavors or mix-ins to the chocolate?
Yes! Adding a drop of vanilla or almond extract can enhance the flavor. You could also sprinkle finely chopped nuts or dried flower petals on the wishbones before chilling for a decorative touch.
How long do the chocolate wishbones keep their texture after making?
Stored properly in an airtight container away from heat and humidity, the wishbones will stay crisp for about a week. Beyond that, they may soften or lose their snap.
Are these Chocolate Wishbones Recipe treats suitable for gifts?
Definitely! Their delicate, charming look makes them perfect for gifting. Package them in small bags or boxes with a pretty ribbon, and they’ll be a delightful homemade present.
Final Thoughts
There’s something truly magical about crafting your own edible wishbones with this Chocolate Wishbones Recipe. It’s simple, rewarding, and delicious, making it a perfect project for a sweet treat that’s sure to brighten up any occasion. Go ahead and give it a try—you’ll love watching those smooth, creamy wishbones come to life and sharing them with your favorite people!
Print
Chocolate Wishbones Recipe
- Prep Time: 5 minutes
- Cook Time: 5 minutes (melting and setting time not included as active cooking)
- Total Time: 10 minutes
- Yield: Approximately 30 wishbones (2½ dozen)
- Category: Dessert
- Method: No-Cook
- Cuisine: American
- Diet: Vegetarian
Description
These delicate Chocolate Wishbones are made from smooth white chocolate melts, crafted into charming wishbone shapes perfect for festive treats or gifting. Quick and easy to prepare, they require no baking and set quickly in the refrigerator, making them an ideal sweet for last-minute celebrations or as a fun kitchen project.
Ingredients
Ingredients
- 12 oz White Chocolate Wafers/Melts/Bark
Equipment
- Sandwich size plastic baggie
- Parchment paper
- Microwave-safe bowl
- Cookie sheet
Instructions
- Prepare the workspace: Line a cookie sheet with parchment paper to create a non-stick surface for shaping the wishbones and for the chocolate to set.
- Melt the chocolate: Place the white chocolate wafers in a microwave-safe bowl. Microwave in 30-second increments, stirring thoroughly each time until fully melted and smooth without any lumps.
- Prepare the piping bag: Spoon the melted chocolate into the corner of a sandwich-sized plastic baggie. Snip off just a small tip of the corner to create a fine opening for piping.
- Shape the wishbones (left side): Begin at the bottom of the wishbone by squeezing out a small oval shape. Without lifting the bag, continue piping to the left side upward in a half-heart shape. When reaching the desired size at the top, squeeze out a little extra to form another small oval.
- Shape the wishbones (right side): Lift the baggie off and return to the bottom oval. Pipe the right side of the wishbone mirroring the left side’s shape to complete the design.
- Set the chocolate: Place the cookie sheet in the refrigerator for 3-5 minutes to allow the chocolate to harden completely.
- Serve or store: Once hardened, the chocolate wishbones are ready to enjoy. Store any leftovers in an airtight container to maintain freshness. One 12 oz bag of melts yields approximately 2½ dozen wishbones.
Notes
- Make sure not to cut too large of a hole in the baggie to maintain control over the piping details.
- If the chocolate begins to harden while piping, briefly reheat it in the microwave for 10-15 seconds to soften.
- Use parchment paper to prevent sticking and for easy removal of the wishbones after setting.
- These wishbones can be decorated with edible glitter or colored sugar before setting for a festive look.
- Store in a cool, dry place away from direct sunlight to avoid melting or discoloration.


