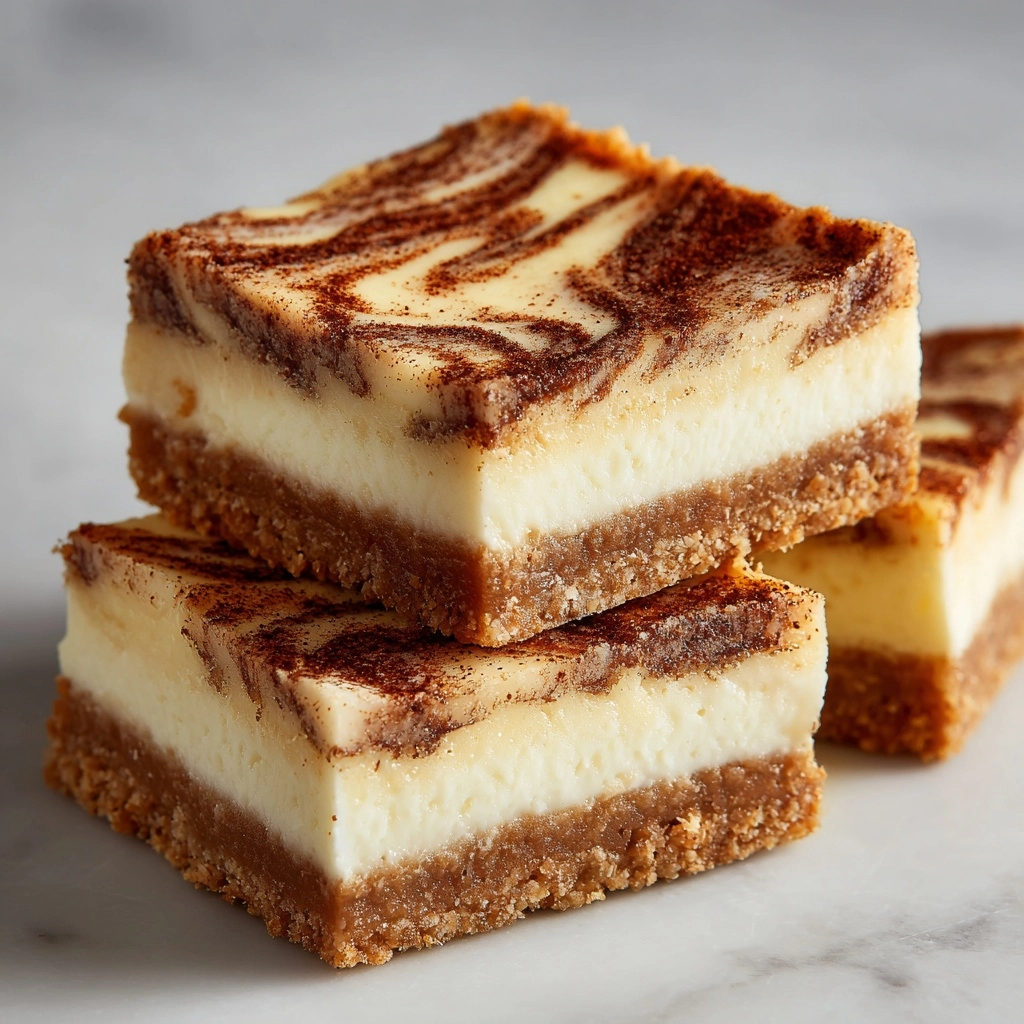
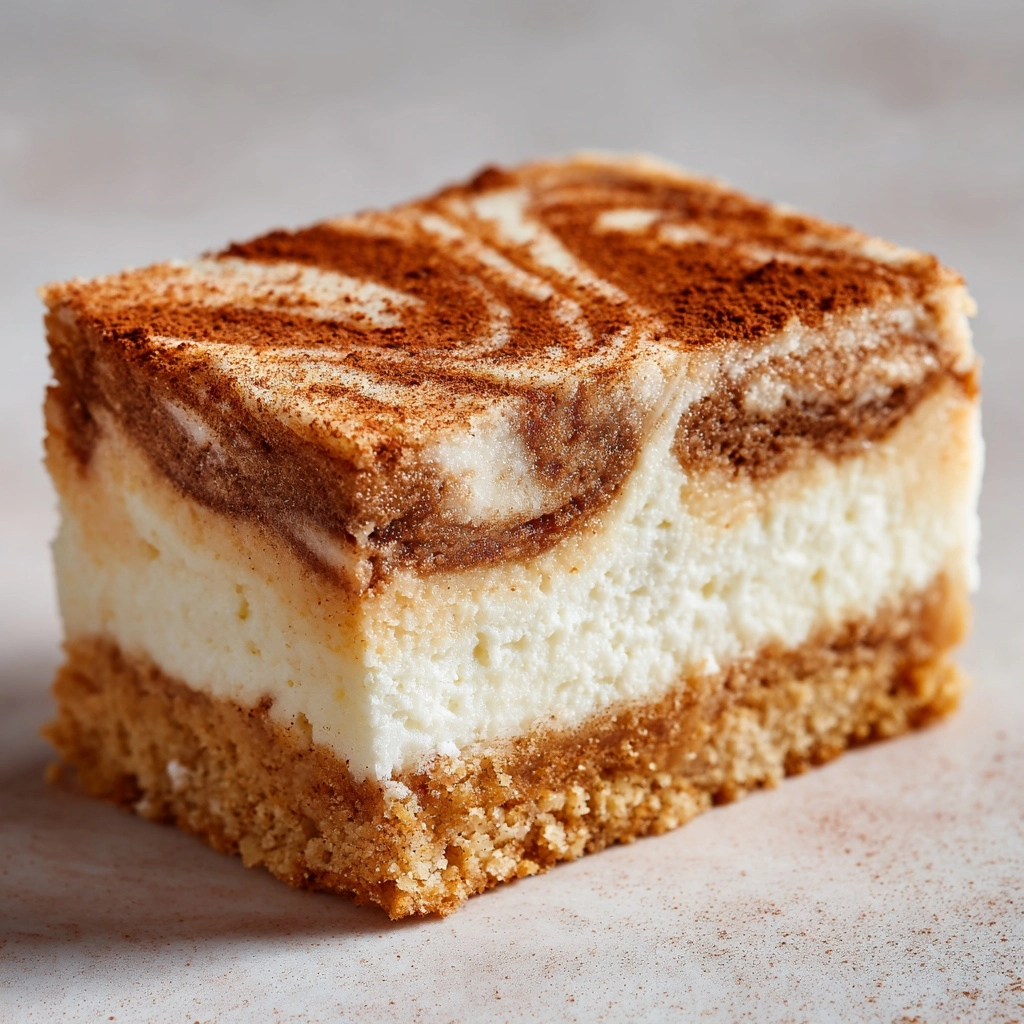
If you’re searching for the ultimate hybrid dessert, Blender Cinnamon Roll Cheesecake Bars might just be your new go-to treat. Imagine all the coziness of a cinnamon roll swirled into the creamy bliss of cheesecake, topped with a drizzle of sweet glaze—all made incredibly simple with your trusty blender. It’s like baking magic; these bars melt two beloved classics into every bite, making them impossible to resist at brunches, potlucks, or simply when you need a pick-me-up any day of the week.
Ingredients You’ll Need
You’ll be thrilled to see how straightforward these ingredients are—nothing fancy, just all-stars that each bring something special to the table. Every single item has a purpose, whether that’s decadent creaminess, a punch of spice, or a classic crust that holds all the goodness together.
- Graham cracker crumbs: The backbone of the crust, bringing a buttery crunch that perfectly supports the creamy layers above.
- Granulated sugar: Sweetens the crust and the cheesecake filling, balancing the tangy and spicy notes.
- Unsalted butter (melted): The magic that holds the crust together and adds richness to the cinnamon swirl.
- Cream cheese (softened): The star for that velvety, luscious cheesecake texture—make sure it’s at room temperature for smooth blending!
- Egg: Binds the cheesecake together for a perfectly set bar once cooled and chilled.
- Sour cream: Brings a subtle tang and makes the cheesecake extra creamy (Greek yogurt is a great swap if you prefer).
- Vanilla extract: Infuses warmth and backbone to both the cheesecake and the swirl.
- Ground cinnamon: The heart of that classic cinnamon roll flavor, used in both the filling and the swirl.
- Ground nutmeg: Just a pinch goes a long way, providing extra warmth and depth to the spice profile.
- Salt: Rounds out the sweetness and amplifies every flavor in the bar.
- Brown sugar (packed): Adds a deep, caramel-like sweetness to the cinnamon swirl, making it taste just like the middle of a cinnamon roll.
- All-purpose flour: Thickens the cinnamon filling so it swirls rather than sinks.
- Powdered sugar: Whisked into the glaze for that signature sweet drizzle.
- Milk: Loosens the glaze until it’s the perfect pour-over consistency.
How to Make Blender Cinnamon Roll Cheesecake Bars
Step 1: Prepare Your Pan and Preheat Oven
Preheat your oven to 325°F and line an 8×8-inch baking pan with parchment paper, leaving overhang on two sides for easy lifting later. This little setup move ensures your Blender Cinnamon Roll Cheesecake Bars come out looking as gorgeous as they taste.
Step 2: Make the Graham Cracker Crust
In a mixing bowl, stir together the graham cracker crumbs, 2 tablespoons of granulated sugar, and the melted butter. Mix until all the crumbs are evenly moistened. Press this mixture firmly and evenly into the bottom of your prepared pan—use the flat bottom of a measuring cup for best results. This becomes the crisp, buttery foundation for everything to come.
Step 3: Blend the Cheesecake Filling
Add cream cheese, 1/3 cup granulated sugar, egg, sour cream, vanilla, ground cinnamon, nutmeg, and salt into your blender. Blend until the mixture is completely smooth and no lumps remain—scrape down the sides if needed. This is where your bars get their dreamy, creamy texture without breaking a sweat or dragging out a stand mixer.
Step 4: Layer and Swirl
Pour the cheesecake filling gently over your prepared crust, spreading it into an even layer. In a small bowl, combine brown sugar, 1 tablespoon ground cinnamon, flour, and melted butter to form a thick, fragrant cinnamon paste. Drop small spoonfuls over the cheesecake, then take a knife or skewer and swirl the mixture through the top to create beautiful cinnamon ribbons—this is the step that gives Blender Cinnamon Roll Cheesecake Bars their iconic look and irresistible cinnamon bursts in every bite.
Step 5: Bake
Slide the pan into your preheated oven and bake for 35 to 40 minutes. The bars are done when the center jiggles just slightly but the edges look set. Don’t worry if it doesn’t look fully firm—it will finish setting as it chills.
Step 6: Cool and Chill
Allow the pan to cool to room temperature on a rack. Once cooled, cover and refrigerate the bars for at least 2 hours, or until fully chilled. This time is essential—it lets the cheesecake flavor deepen and ensures perfect, clean slices.
Step 7: Make the Glaze and Serve
Stir together powdered sugar and just enough milk to make a thick but pourable glaze. Once the bars are chilled, drizzle the glaze generously over the top. Lift them out of the pan using the parchment, slice into neat bars, and get ready for cheers and second helpings.
How to Serve Blender Cinnamon Roll Cheesecake Bars

Garnishes
To really make these Blender Cinnamon Roll Cheesecake Bars pop, finish with a dusting of extra cinnamon, a sprinkle of toasted pecans, or a little extra glaze. Even a dollop of softly whipped cream can up the wow factor for special occasions.
Side Dishes
While these bars easily steal the show, serve them alongside fresh strawberries or a bowl of mixed fruit for a refreshing contrast. If you’re feeling bold, pair them with a sweet, creamy latte or iced coffee for the ultimate coffee shop experience right at home.
Creative Ways to Present
For gatherings, cut the bars into mini bites and spear each with a toothpick for easy party snacking. Arrange them in a checkerboard pattern on a platter, or stack them high on a cake stand with drizzle cascading down. You can even serve them as part of a dessert board, nestled between chocolate-dipped fruit and spiced nuts for a truly memorable display.
Make Ahead and Storage
Storing Leftovers
Store any leftover Blender Cinnamon Roll Cheesecake Bars in an airtight container in the refrigerator, where they stay perfectly creamy and flavorful for up to five days. The flavors only meld and improve, making these bars just as dreamy on day three as they are fresh.
Freezing
To freeze, arrange sliced bars (without glaze) on a baking sheet and freeze until firm, then wrap individually and store in a zip-top bag. When you’re ready, thaw in the fridge overnight. Add fresh glaze after thawing for best results.
Reheating
Though these bars are usually served cold, if you love a warm edge, microwave an individual bar (un-glazed) for 10–15 seconds. This ever-so-slightly warms the cheesecake and brings that just-baked cinnamon roll feeling right back.
FAQs
Can I double this recipe for a larger crowd?
Absolutely! Simply double all the ingredients and bake in a 9×13-inch pan. The baking time may increase slightly, so just keep an eye on the center for doneness.
What’s the best way to get clean slices?
For bakery-perfect bars, chill thoroughly before slicing and use a sharp knife wiped clean between each cut. Lifting them out of the pan using the parchment overhang also helps keep edges crisp and neat.
Can I make Blender Cinnamon Roll Cheesecake Bars gluten-free?
Of course! Swap in gluten-free graham crackers for the crust and replace the all-purpose flour in the swirl with your favorite gluten-free blend.
Can I use low-fat cream cheese or a sugar substitute?
Low-fat cream cheese will work, though the bars will be a touch less rich. As for sweeteners, opt for a granulated sugar alternative intended for baking to maintain proper texture.
Why is it important to chill the bars before serving?
Chilling isn’t just for easy slicing—it lets the cheesecake fully set and brings out the best in both the tangy filling and the deep cinnamon flavor. Patience pays off, promise!
Final Thoughts
I hope you’re as excited to make these Blender Cinnamon Roll Cheesecake Bars as I am to share them! Every swirl and creamy bite is a celebration of comfort and sweetness, with just enough cinnamon spice to make them unforgettable. Give them a go, and don’t be surprised if they become a staple in your dessert rotation!