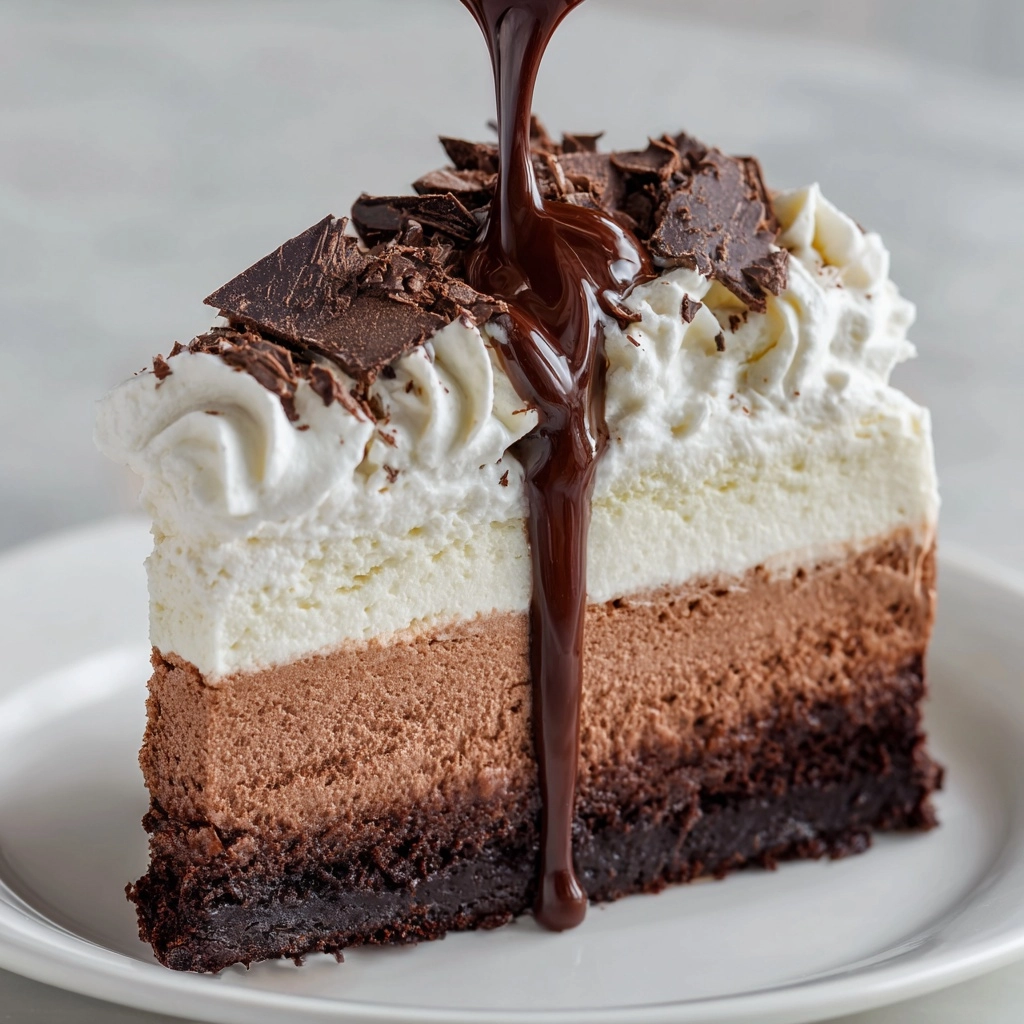
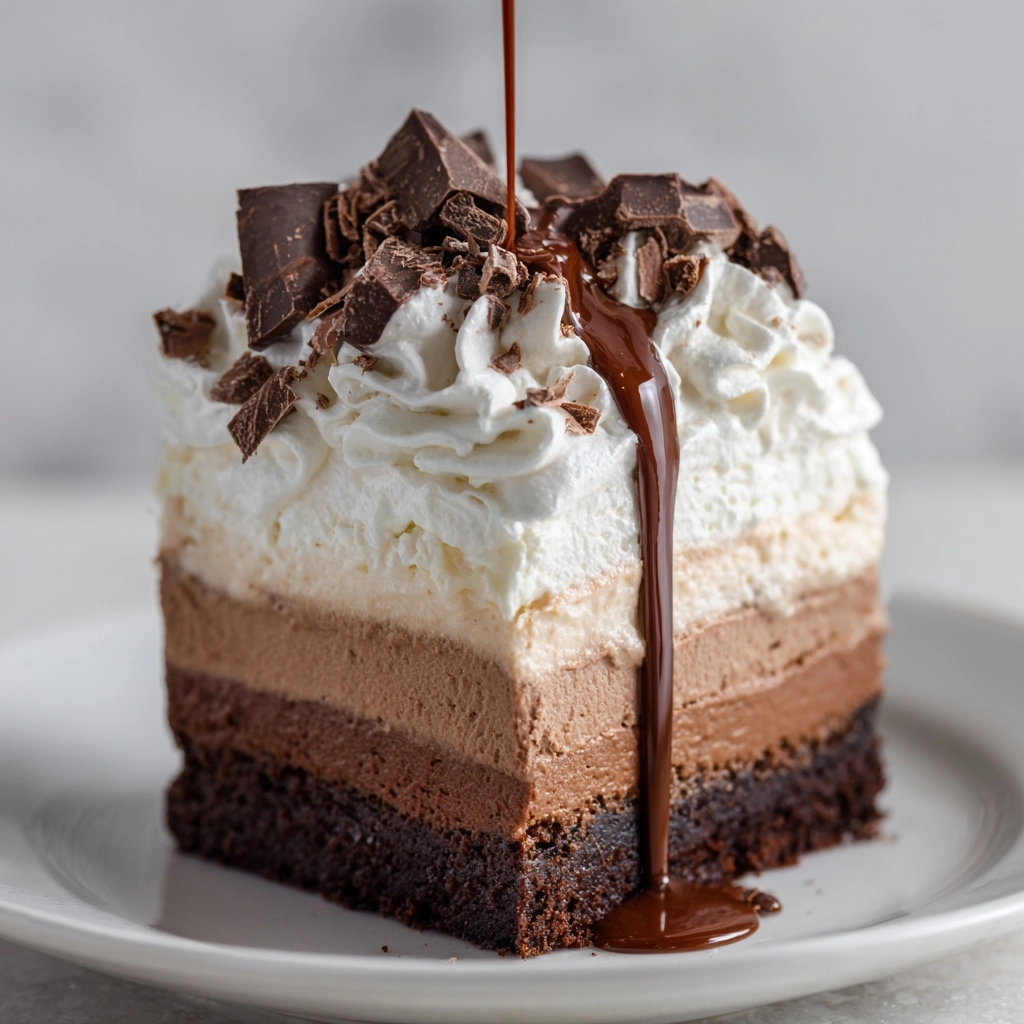
If there was ever a show-stopping dessert guaranteed to steal the spotlight at any gathering, it’s the Chocolate Brownie Mousse Cake. This dreamy confection pairs a fudgy, irresistible brownie base with a thick, silky layer of chocolate mousse, then crowns the whole creation with clouds of whipped cream and a flourish of chocolate shavings. Every slice delivers deep chocolate flavor, contrasting textures, and pure decadence—yet the recipe is simple enough for home bakers of any level. The Chocolate Brownie Mousse Cake is a love letter to chocolate in all its most satisfying forms.
Ingredients You’ll Need
Despite its gourmet vibe, this cake comes together with pantry-friendly ingredients, each playing a crucial role in building up those iconic textures and deep flavors. Here’s what you’ll need, and why every component matters.
- Unsalted butter (1/2 cup, melted): This is the rich backbone of the brownie base, adding flavor and fudginess.
- Granulated sugar (1 cup + 2 tbsp): It sweetens both the brownie and mousse while ensuring a moist crumb in the base.
- Large eggs (2): Essential for structure and binding the brownie layer, they keep it chewy and cohesive.
- Vanilla extract (2 tsp): Just a splash brings out the chocolatey notes in both the brownie and mousse.
- Unsweetened cocoa powder (1/3 cup): This adds the first layer of chocolate punch to the brownie.
- All-purpose flour (1/2 cup): Provides the framework for the brownie, keeping it dense but not heavy.
- Salt (1/4 tsp): A dash balances the sweetness and sharpens the chocolate flavor.
- Baking powder (1/4 tsp): Works subtly to lighten the brownie crumb just enough.
- Heavy whipping cream (2 cups, divided): The secret to that luscious mousse and pillowy topping.
- Semi-sweet chocolate (8 oz, chopped): The heart of the mousse; pick a good-quality brand for best results.
- Powdered sugar (2 tbsp): Stabilizes and sweetens the whipped cream topping, making it cloud-like.
- Chocolate shavings or cocoa powder (for garnish): Optional, but adds café-style flair and even more chocolate aroma.
How to Make Chocolate Brownie Mousse Cake
Step 1: Make the Brownie Base
Start by preheating your oven to 350°F (175°C) and lining the bottom of a 9-inch springform pan with parchment paper. In a medium bowl, whisk the melted butter, sugar, eggs, and vanilla until shiny and smooth—it should look glossy, not gritty. Now stir in the cocoa powder, flour, salt, and baking powder, mixing just until there are no streaks of flour left. Pour the batter into your prepared pan and spread evenly. Bake for 20 to 25 minutes, just until a toothpick inserted in the center comes out with a few moist crumbs attached. Let the brownie base cool completely in the pan, since you’ll build the rest of your layers right on top.
Step 2: Prepare the Chocolate Mousse
While your brownie cools, it’s mousse time! Warm 1/2 cup of the heavy cream in a small saucepan until it just starts to simmer. Immediately pour it over your chopped chocolate in a heat-safe bowl. Resist the urge to stir at first—let it sit undisturbed for 2 minutes so the chocolate softens. Then, whisk until smooth and glossy, setting aside to cool back to room temperature. In a separate bowl, use an electric mixer to whip the remaining 1 cup of cream with 2 tablespoons of granulated sugar and 1 teaspoon of vanilla extract until you get soft, fluffy peaks. Gently fold the whipped cream into your cooled chocolate mixture, working carefully so you don’t deflate all that lovely air. You’ll end up with a mousse that’s light but intensely chocolaty.
Step 3: Layer and Chill
Spoon your chocolate mousse directly over the fully cooled brownie base while it’s still in the springform pan. Use an offset spatula to spread it right to the edges, smoothing the top. Now comes the hard part: cover and refrigerate the cake for at least 4 hours, or until the mousse is thoroughly set. This chill time is key to achieving those beautiful, clean layers when you slice.
Step 4: Whip Up the Creamy Topping
Just before serving, combine 1/2 cup of heavy cream and 2 tablespoons of powdered sugar in a mixing bowl. Beat with a hand mixer (or a sturdy whisk if you’re feeling old-school) until soft peaks form. You can either slather this cloudlike cream over the mousse layer with a spatula for a rustic look, or pipe it into decorative swirls if you’re feeling fancy.
Step 5: Garnish and Serve
Set the scene by showering your cake with chocolate shavings or a classic dusting of cocoa powder for a professional touch. Run a sharp knife around the inside edge of the springform pan before unclasping it, then slice and serve while the cake is chilled for the neatest, prettiest pieces of Chocolate Brownie Mousse Cake.
How to Serve Chocolate Brownie Mousse Cake

Garnishes
Take your Chocolate Brownie Mousse Cake from “wow” to “WOW” with a few simple garnishes. Try a snow-capped look with fluffy whipped cream, rustic chocolate shavings, or dramatic cocoa powder patterns using a small sieve. For a burst of color, dot the top with fresh raspberries, strawberries, or even a sprig of mint for a fresh finish.
Side Dishes
While this cake shines all on its own, pairing it with a scoop of vanilla or salted caramel ice cream adds a delightful temperature and flavor contrast. For a more sophisticated touch, offer it alongside espresso, black coffee, or a drizzle of tangy fruit coulis – these extras highlight the rich cocoa depth of the Chocolate Brownie Mousse Cake beautifully.
Creative Ways to Present
Miniaturize the magic by making individual servings in ramekins or mason jars—just layer brownie pieces, mousse, and cream for a gorgeous trifle effect. Or, try cutting the cake into slender bars and swirling extra mousse on top. You could even incorporate seasonal fruit between the layers for an elegant twist!
Make Ahead and Storage
Storing Leftovers
Leftover Chocolate Brownie Mousse Cake keeps beautifully in the fridge, making it perfect for prepping a day ahead. Store slices or the whole cake tightly covered in the refrigerator for up to four days. The flavors actually meld and become even more decadent after a night’s rest.
Freezing
If you want to save some chocolate bliss for later, wrap the un-topped cake (brownie and mousse layers) well in plastic wrap and foil, then freeze for up to two months. When you’re ready to enjoy, thaw overnight in the fridge, then add the whipped cream topping and garnish just before serving. Freezing with the cream topping is not recommended, as it can affect the texture.
Reheating
This cake is best served chilled or at cool room temperature, so there’s no need for reheating. If it’s been frozen, simply allow adequate time to thaw gently in the fridge before serving. If your slices are a bit too cold, a couple minutes on the counter softens the mousse to its ideal, velvety texture.
FAQs
How do I make sure my brownie base stays fudgy?
For that perfect fudgy texture, avoid over-baking! Aim to pull the brownie from the oven as soon as a toothpick comes out with a few moist crumbs. Over-mixing the batter can make it cakey, so stir until just combined after adding the dry ingredients.
Can I use dark chocolate instead of semi-sweet for the mousse?
Absolutely! Using dark chocolate in the mousse intensifies the chocolate experience and results in a richer, more grown-up flavor profile for your Chocolate Brownie Mousse Cake. Your garnish can also play off the deeper notes—think dark chocolate curls or espresso powder on top.
Is this recipe gluten-free or easily adaptable for gluten-free diets?
The base recipe calls for all-purpose flour, but you can substitute a good 1-to-1 gluten-free baking flour. Everything else is already gluten-free, so just check your chocolate labels to be sure!
Can I make the whole cake ahead of time?
This dessert was born to be made ahead! Assemble the cake through the mousse layer and refrigerate overnight. Add the whipped cream topping and garnishes just before serving for the freshest presentation and texture.
My mousse isn’t setting properly. What went wrong?
Usually, the culprit is warm mousse or over-whipped/under-whipped cream. Make sure your chocolate mixture is fully cooled before folding in the whipped cream. Also, chill the assembled cake for at least 4 hours to achieve that beautifully firm mousse layer.
Final Thoughts
If you’re searching for a knockout dessert that never fails to impress, look no further than this Chocolate Brownie Mousse Cake. Each layer comes together with ease, but the result is pure bakery-worthy brilliance. Treat yourself and your favorite people to a slice—you’re going to want to make this again and again!