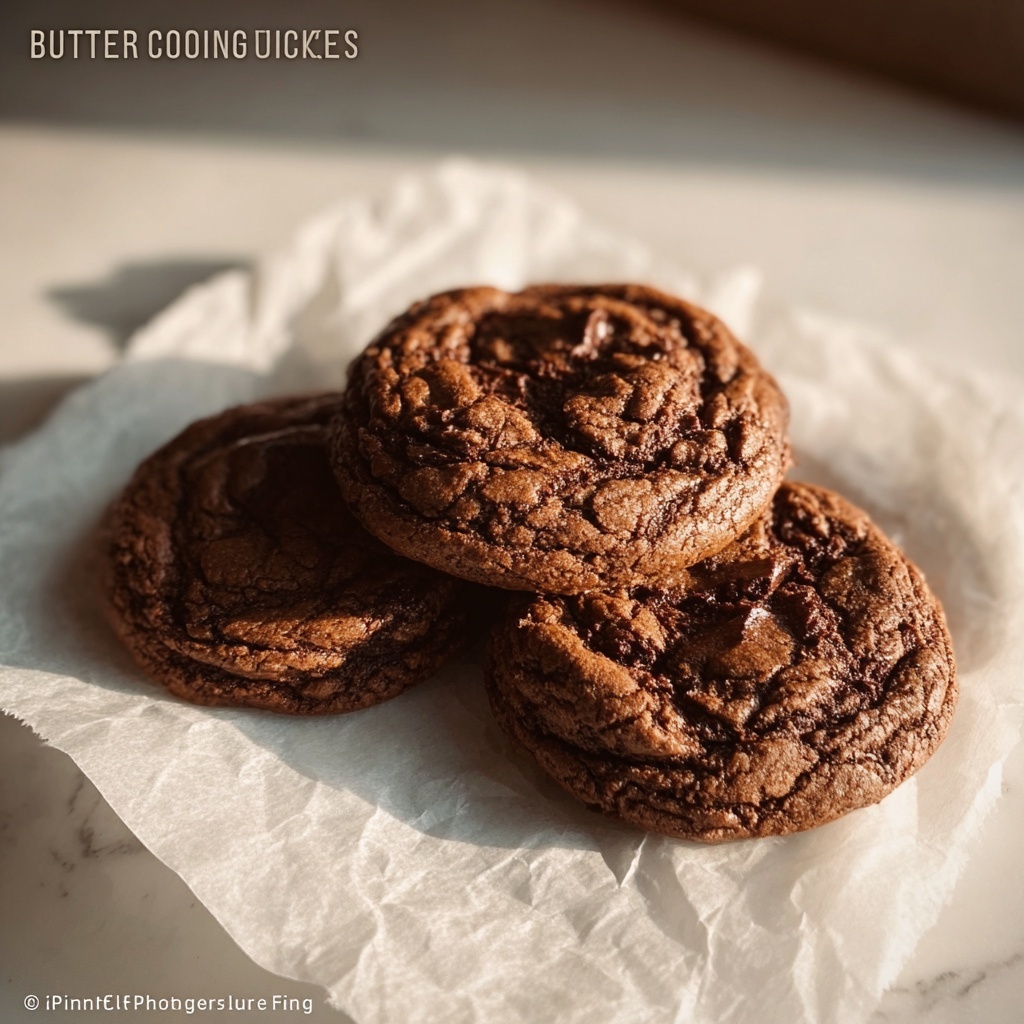
If you’re on the hunt for a cookie that’s bursting with chocolate, peanut butter, and that unforgettable crunch of Butterfinger candy, then you’ve just hit the jackpot with this Butterfinger Pudding Cookies Recipe. These cookies are a luscious blend of soft, chewy texture enriched by the instant chocolate pudding and an irresistible mix of peanut butter and cocoa. Every bite delivers a delightful surprise, thanks to the chopped Butterfinger bars melting slightly inside while still keeping that satisfying crunch. Trust me, once you bake a batch of these, they’ll quickly become your new go-to treat for any occasion.
Ingredients You’ll Need
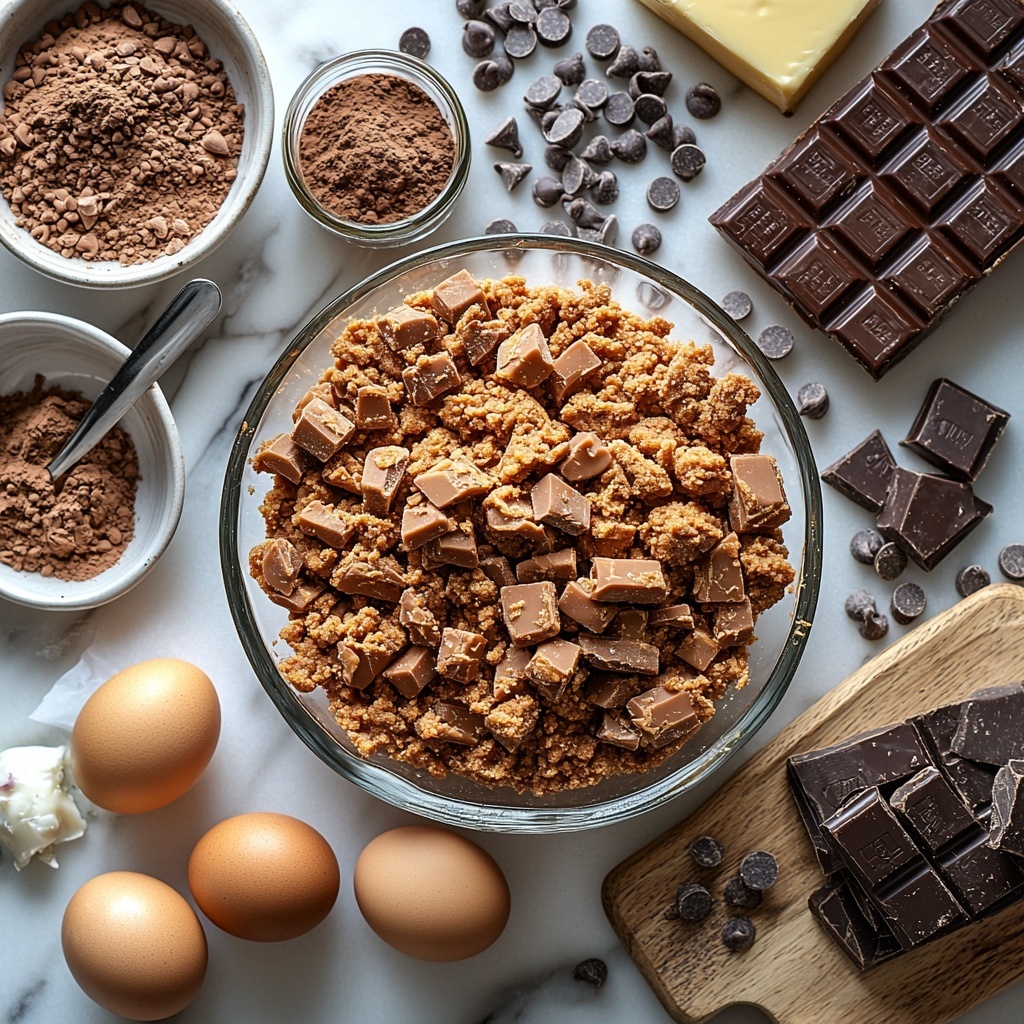
It might look like quite a list, but each ingredient plays a crucial role in turning these cookies into a rich, flavorful masterpiece. From the creamy peanut butter to the instant chocolate pudding, every element contributes to the incredible texture, taste, and color that make this recipe a standout.
- Butter (3/4 cup, softened): Creates a tender, rich base and adds buttery flavor you’ll love.
- Creamy peanut butter (1/2 cup): Gives the cookies a luscious, nutty depth and moisture to keep them soft.
- Sugar (1/2 cup): Balances sweetness and helps with browning.
- Brown sugar (1/2 cup): Adds a slight caramel note and chewy texture.
- Eggs (2 large): Bind everything together and provide structure.
- Vanilla extract (1 teaspoon): Enhances the flavors with its warm, aromatic essence.
- Cocoa powder (1/4 cup): Delivers a rich chocolate punch and dark color.
- All-purpose flour (2 1/4 cups): The sturdy backbone that holds these cookies firmly.
- Baking soda (1 teaspoon): Gives the perfect rise and slight crispness on the edges.
- Salt (1/2 teaspoon): Balances sweetness and intensifies chocolate and peanut butter flavors.
- Instant chocolate pudding mix (1 box, 3.4 oz): The secret to extra moist, soft, tender cookies.
- Chocolate chips (1 cup): Add gooey melty pockets of chocolate in every bite.
- Fun-sized Butterfinger candy bars (10, chopped): Brings that explosive crunchy candy texture that sets these cookies apart.
How to Make Butterfinger Pudding Cookies Recipe
Step 1: Cream the Buttery Goodness
Start by beating the softened butter and creamy peanut butter together with both sugars until smooth and fluffy. This step is essential because it incorporates air, which helps with the cookie’s texture. Next, add the eggs one at a time with the vanilla extract, creating a rich base to hold all the flavors together perfectly.
Step 2: Combine Dry Ingredients for Perfect Harmony
In a separate bowl, mix the cocoa powder, flour, baking soda, salt, and the instant chocolate pudding mix. This dry blend is the magic that makes these cookies so moist and tender. Gently add this mixture to the wet ingredients while mixing just enough to combine — you want everything rich and cohesive but not overworked.
Step 3: Fold in the Chocolate Chips and Butterfinger Candy
Now comes the exciting part: fold in the chocolate chips and chopped Butterfinger bars with a spatula. These chunks add bursts of chocolate and delightful crunchy candy bits throughout every cookie. Once incorporated, cover the dough and pop it in the fridge to chill for at least 30 minutes — this step helps prevent spreading and enhances flavor melding.
Step 4: Bake to Golden Perfection
Heat your oven to 350°F and line baking sheets with parchment paper. Roll the chilled dough into 1-inch balls—you’ll find this size is perfect for balanced baking. Place them evenly spaced on the sheets and bake for 8 minutes. The edges will firm up while the centers remain soft and chewy. Let the cookies cool for a couple of minutes on the sheet before transferring to a wire rack.
How to Serve Butterfinger Pudding Cookies Recipe
Garnishes
If you want to dress these cookies up a bit, try drizzling some melted chocolate over the top or sprinkling a pinch of flaky sea salt to contrast the sweet richness. A light dusting of powdered sugar can also add a lovely touch for special occasions.
Side Dishes
Pair these decadent cookies with a cold glass of milk, creamy coffee, or even a scoop of vanilla ice cream for the ultimate dessert experience. The smooth creaminess of milk or ice cream balances the intense chocolaty peanut butter flavors beautifully.
Creative Ways to Present
Arrange the cookies on a wooden board with clusters of fresh berries and nuts for a rustic look at parties. Alternatively, stack them in a pretty jar with some ribbon tied around for gifting. You can even sandwich a little peanut butter or chocolate spread between two cookies for a fun twist.
Make Ahead and Storage
Storing Leftovers
Once cooled, store your Butterfinger Pudding Cookies in an airtight container at room temperature. They’ll stay soft and chewy for up to one week, making them excellent for prepping ahead of time.
Freezing
You can freeze the unbaked cookie dough balls on a parchment-lined tray for up to 3 months. When you’re ready, bake them straight from frozen, adding a couple of extra minutes to the bake time. Baked cookies freeze well too; just thaw at room temperature before enjoying.
Reheating
If you want to warm up a cookie, pop it in the microwave for about 15 seconds or heat briefly in a toaster oven. This brings back the soft, melty chocolate chip goodness as if fresh from the oven.
FAQs
Can I use crunchy peanut butter instead of creamy?
While creamy peanut butter is recommended for a smooth dough texture, you can use crunchy peanut butter if you’d like extra nutty bits in your cookies. Just expect a slightly different chew and mouthfeel.
Does the instant pudding mix affect how long the cookies last?
The pudding mix adds moisture, helping the cookies stay soft longer than typical cookies. However, storing them properly in an airtight container is still important to keep freshness.
Can I substitute Butterfinger bars with another candy?
Absolutely! While Butterfinger is iconic here, chopped Heath bars or even Reese’s Pieces could be fun alternatives to give some variety in texture and flavor.
Why do I need to chill the dough before baking?
Chilling firms up the dough which prevents the cookies from spreading too much and encourages richer flavor development, making the final texture perfect every time.
What if I don’t want to use cocoa powder?
Cocoa powder gives a lovely chocolate depth but you can leave it out to make peanut butter Butterfinger cookies instead. Just note the flavor and color will be less rich and chocolatey.
Final Thoughts
Making this Butterfinger Pudding Cookies Recipe is more than just baking; it’s creating a batch of smiles, cozy moments, and delicious memories. These cookies truly bring together the best of chocolate, peanut butter, and candy crunch in one bite. So grab your mixing bowls and give this recipe a try—you won’t be disappointed, and soon enough, you might find yourself baking them again and again.
Print
Butterfinger Pudding Cookies Recipe
- Prep Time: 15 minutes
- Cook Time: 8 minutes
- Total Time: 38 minutes
- Yield: 60 cookies
- Category: Dessert
- Method: Baking
- Cuisine: American
Description
These Butterfinger Pudding Cookies are chewy, chocolatey, and packed with chunks of crunchy Butterfinger candy bars and chocolate chips. The addition of instant chocolate pudding in the dough makes these cookies incredibly moist and soft with a perfect balance of peanut butter and cocoa flavors. This recipe yields a large batch, ideal for parties or sharing with friends and family.
Ingredients
Wet Ingredients
- 3/4 cup butter, softened
- 1/2 cup creamy peanut butter
- 1/2 cup sugar
- 1/2 cup brown sugar
- 2 large eggs
- 1 teaspoon vanilla extract
Dry Ingredients
- 1/4 cup cocoa powder
- 2 1/4 cups all-purpose flour
- 1 teaspoon baking soda
- 1/2 teaspoon salt
- 1 box (3.4 oz) instant chocolate pudding mix
Mix-ins
- 1 cup chocolate chips
- 10 fun-sized Butterfinger candy bars, chopped
Instructions
- Cream Butter and Sugars: In a medium bowl, use an electric mixer to cream the softened butter, creamy peanut butter, sugar, and brown sugar until the mixture is smooth and thoroughly combined. Then add the eggs and vanilla extract, mixing well to incorporate all ingredients fully.
- Combine Dry Ingredients and Mix: In a separate medium bowl, whisk together the cocoa powder, all-purpose flour, baking soda, salt, and instant chocolate pudding mix. Gradually add these dry ingredients to the creamed wet mixture, mixing until well combined. Next, fold in the chocolate chips and chopped Butterfinger candy bars. Cover the bowl with plastic wrap and refrigerate the dough for at least 30 minutes to chill and firm up.
- Preheat Oven and Prepare Baking Sheets: Preheat your oven to 350°F (175°C). Line baking sheets with parchment paper to prevent sticking and ease clean-up.
- Shape and Bake Cookies: Roll the chilled dough into 1-inch balls, spacing them evenly on the prepared baking sheets. Bake in the preheated oven for 8 minutes, or until the edges are set but the centers remain soft. After baking, let the cookies cool for about 2 minutes on the baking sheets before transferring them onto wire racks to cool completely.
- Storage: Once cooled, store the cookies in a covered container to maintain freshness and enjoy over several days.
Notes
- Chilling the dough is important to prevent spreading during baking and to enhance flavor.
- You can substitute Butterfinger candy bars with similar crunchy peanut butter candies if unavailable.
- The instant chocolate pudding mix adds moisture and a richer chocolate flavor to the cookies.
- For a gluten-free option, substitute the all-purpose flour with an equal amount of gluten-free flour blend.
- Cookies can be stored in an airtight container at room temperature for up to one week or frozen for up to three months.
