“`html
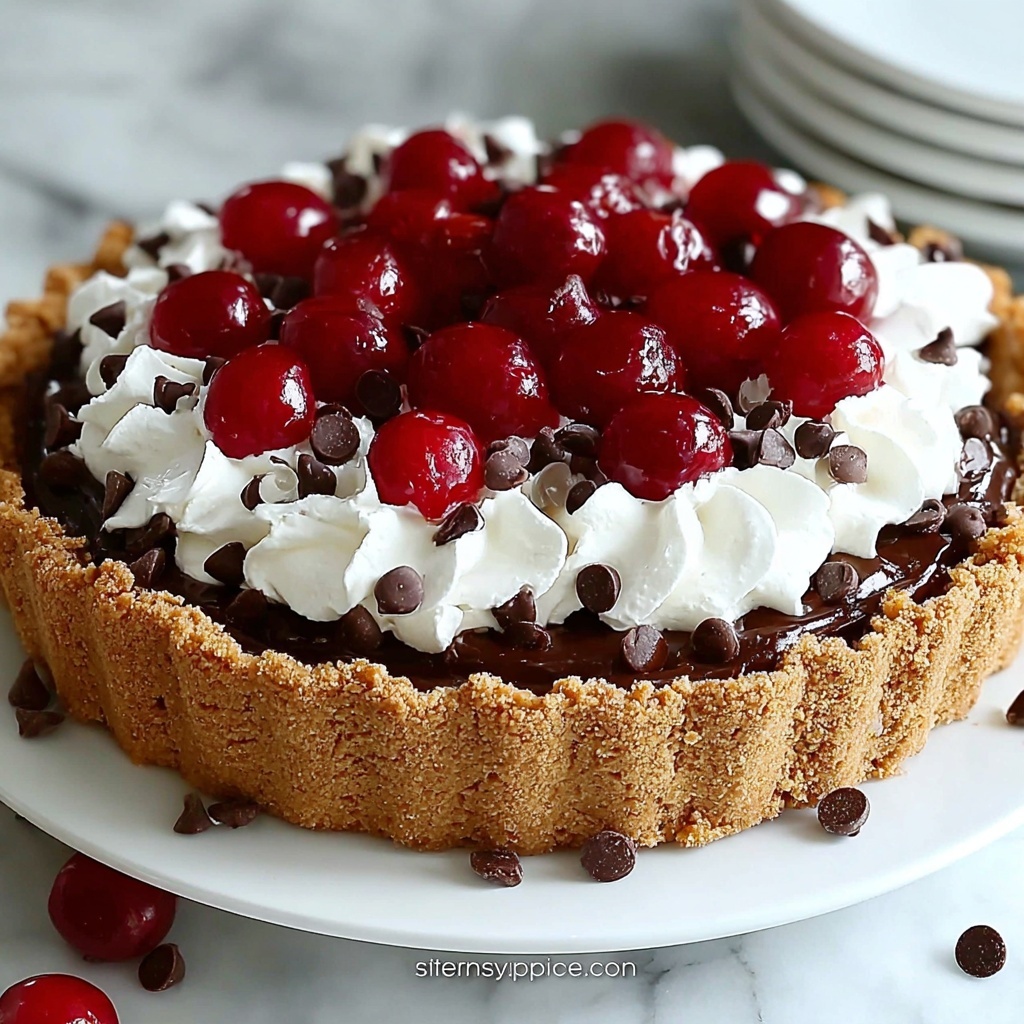
If you’ve been searching for the perfect crowd-pleaser that’s as delightful to eat as it is simple to make, this No-Bake Easy Cherry Chocolate Chip Pie Recipe is about to become your new best friend. Imagine the tangy sweetness of cherry pie filling layered atop a buttery graham cracker crust, all studded with pockets of rich chocolate chips, then crowned with fluffy whipped topping. This pie comes together effortlessly without turning on your oven, making it an ideal treat for warm days or last-minute dessert plans. I promise, once you try this recipe, you’ll wonder why you ever made pie any other way!
Ingredients You’ll Need
Gathering the right ingredients for this pie is a breeze, and each one plays a crucial role in building layers of flavor, texture, and visual appeal. From the crunchy base to the creamy whipped topping, these basics come together to create a dessert that’s both nostalgic and fresh.
- 2 cups graham cracker crumbs: The foundation of your crust, providing that irresistible buttery crunch and a hint of sweetness.
- 1/2 cup melted butter: Helps bind the graham crumbs into a firm and flavorful crust that holds its shape perfectly.
- 1/4 cup granulated sugar: Adds just the right amount of sweetness to balance the crust.
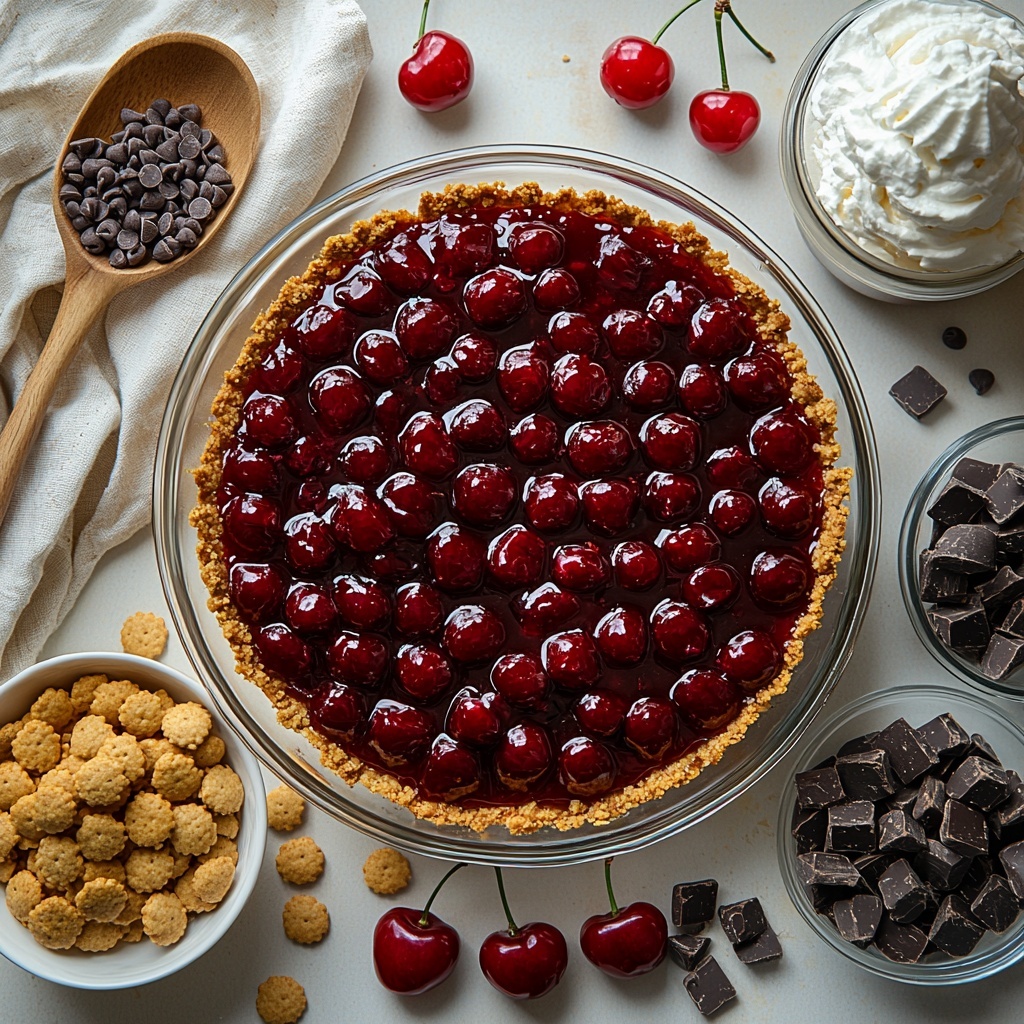
- 1 can (21 oz) cherry pie filling: The star ingredient that brings a juicy burst of fruity flavor and vibrant color to your pie.
- 1 cup chocolate chips: Little pockets of melted chocolate magic that contrast beautifully with the cherries.
- 1 tub (8 oz) whipped topping: Provides a light, airy finish that softens the tartness and adds luscious creaminess.
- Optional – additional chocolate chips and cherries for garnish: Perfect for adding an elegant and tempting touch to your pie’s presentation.
How to Make No-Bake Easy Cherry Chocolate Chip Pie Recipe
Step 1: Prepare the Crust
Start by mixing the graham cracker crumbs, melted butter, and sugar in a medium bowl until everything is evenly combined. This mixture forms the essential base, so press it firmly into the bottom and sides of a 9-inch pie pan. Make sure it’s tightly packed—that’s what gives the crust the best texture and prevents it from falling apart. Pop it into the fridge for 30 minutes to chill and firm up before adding the layers on top.
Step 2: Add the Cherry Filling
Once your crust is nicely chilled and set, spread the cherry pie filling evenly over it. Using a spatula helps smooth out the filling so every bite has that gorgeous, fruity thickness. The cherry layer brings fresh, tangy sweetness and vibrant color that really make this pie stand out.
Step 3: Sprinkle Chocolate Chips
Now for a fun surprise in every slice—sprinkle one cup of chocolate chips evenly over the cherries. These melt slightly into the filling’s juices, creating rich pockets of chocolate that perfectly complement the bright cherry flavor. Trust me, this contrast is everything.
Step 4: Top with Whipped Cream
Spoon or pipe the whipped topping generously on top of the chocolate chip layer. This fluffy cloud not only adds creaminess but also tones down some of the tartness from the cherries. If you’re feeling fancy, create decorative swirls to make your pie look as fantastic as it tastes.
Step 5: Garnish and Chill
Finish by scattering some extra chocolate chips and fresh cherries on top to amp up the visual appeal and flavor. Refrigerate the pie for at least two hours—this chilling time is essential to let everything set properly and for the flavors to meld into a luscious, sliceable dessert.
How to Serve No-Bake Easy Cherry Chocolate Chip Pie Recipe
Garnishes
Adding extra cherries and chocolate chips as garnish doesn’t just make your pie look irresistible; those little touches add a final burst of texture and flavor in every bite. You can also sprinkle a pinch of crushed graham crackers or a dusting of powdered sugar for an extra-special finish that will wow your guests.
Side Dishes
This pie pairs beautifully with a scoop of vanilla ice cream or a drizzle of chocolate sauce if you want to take indulgence to the next level. A cup of hot coffee or a refreshing iced tea provides the perfect balance to the pie’s sweet, rich, and tangy profile.
Creative Ways to Present
Try serving this pie in individual clear glasses layered with extra cherries and chocolate chips to showcase all the colors and textures. Alternatively, top it with fresh mint leaves for a pop of green and a hint of fresh aroma that elevates the entire dessert experience.
Make Ahead and Storage
Storing Leftovers
This pie stays fresh and delicious in an airtight container in the refrigerator for up to four days. Keep it chilled to preserve the whipped topping’s light texture and the crust’s crispness. Before serving leftover slices, you might want to let them sit out at room temperature for a few minutes to soften slightly for a more enjoyable bite.
Freezing
If you want to make this No-Bake Easy Cherry Chocolate Chip Pie Recipe ahead of time for a special occasion, you can freeze it—but only before adding the whipped topping. Wrap the pie tightly in plastic wrap and foil, and freeze for up to one month. When you’re ready to serve, thaw it overnight in the fridge, then add the whipped topping and garnishes fresh.
Reheating
Since this is a no-bake pie, reheating isn’t necessary or recommended. It’s best served chilled or at room temperature to enjoy the perfect balance of creamy and fruity textures. If your pie has been in the fridge, simply allow it to rest outside for 10 to 15 minutes before serving.
FAQs
Can I use fresh cherries instead of canned cherry pie filling?
Absolutely! Fresh cherries will add a lovely natural sweetness and texture, but you’d want to cook them down with some sugar and a bit of cornstarch to create a similar pie filling consistency. This way, your No-Bake Easy Cherry Chocolate Chip Pie Recipe still holds that classic rich and gooey layer.
What if I want to make this pie gluten-free?
No problem! Simply swap the graham cracker crumbs for a gluten-free alternative, such as gluten-free cookie crumbs or crushed nut-based crust options. This swap keeps the texture just right while accommodating dietary needs.
Can I substitute the chocolate chips for another type of chocolate?
Definitely try mini white chocolate chips or butterscotch chips for a fun twist. You could even finely chop a chocolate bar for a chunkier texture, adding a different chocolate experience to this delightful pie.
How long should I chill the pie before serving?
Chilling the pie for at least two hours is crucial. This resting time allows the crust to set firmly and the flavors to meld nicely, ensuring every bite is perfectly structured and delicious.
Is this pie suitable for a large gathering?
Yes! This pie is made in a standard 9-inch pan and serves about eight. For bigger crowds, consider doubling the ingredients and preparing two pies in advance. Its ease and popularity mean it’s sure to be a hit every time.
Final Thoughts
I can’t recommend this No-Bake Easy Cherry Chocolate Chip Pie Recipe enough for anyone who loves a dessert that’s as visually stunning as it is scrumptiously simple. It’s perfect for those moments when you want to impress but don’t want to spend hours in the kitchen. Trust me, once you make it, it’ll become a go-to favorite for family dinners, potlucks, or just because. So, grab those ingredients, dive in, and let the magic of cherries and chocolate brighten up your dessert table!
“`
Print
No-Bake Easy Cherry Chocolate Chip Pie Recipe
- Prep Time: 20 minutes
- Cook Time: 0 minutes
- Total Time: 2 hours 20 minutes
- Yield: 8 servings
- Category: Dessert
- Method: No-Cook
- Cuisine: American
- Diet: Vegetarian
Description
This No-Bake Easy Cherry Chocolate Chip Pie is a simple, delicious dessert that combines a buttery graham cracker crust with sweet cherry pie filling, chocolate chips, and fluffy whipped topping. Ready in just a few steps without turning on the oven, it’s perfect for warm days or quick gatherings.
Ingredients
Crust
- 2 cups graham cracker crumbs
- 1/2 cup melted butter
- 1/4 cup granulated sugar
Filling
- 1 can (21 oz) cherry pie filling
- 1 cup chocolate chips
Topping
- 1 tub (8 oz) whipped topping
- Optional: additional chocolate chips and cherries for garnish
Instructions
- Prepare the Crust: In a medium bowl, combine the graham cracker crumbs, melted butter, and granulated sugar until thoroughly mixed. Press this mixture firmly into the bottom and sides of a 9-inch pie pan to create an even crust. Chill the crust in the refrigerator for 30 minutes to set.
- Add the Cherry Filling: Spread the cherry pie filling evenly over the chilled graham cracker crust. Use a spatula to smooth out the filling so it covers the crust uniformly.
- Sprinkle Chocolate Chips: Distribute 1 cup of chocolate chips evenly over the cherry pie filling layer to add a rich, chocolaty texture.
- Top with Whipped Cream: Spoon or pipe the whipped topping generously over the chocolate chips, creating decorative swirls for an attractive presentation.
- Garnish and Chill: Optionally, garnish the pie with extra chocolate chips and cherries on top. Refrigerate the pie for at least 2 hours before serving to allow all layers to set properly and flavors to meld.
Notes
- For best results, chill the crust thoroughly to prevent sogginess.
- You can substitute chocolate chips with mini chocolate chips for a different texture.
- For a healthier twist, use light or reduced-fat whipped topping.
- Make sure to refrigerate the pie well before serving; it tastes better chilled.
- Leftover pie can be stored covered in the fridge for up to 3 days.


