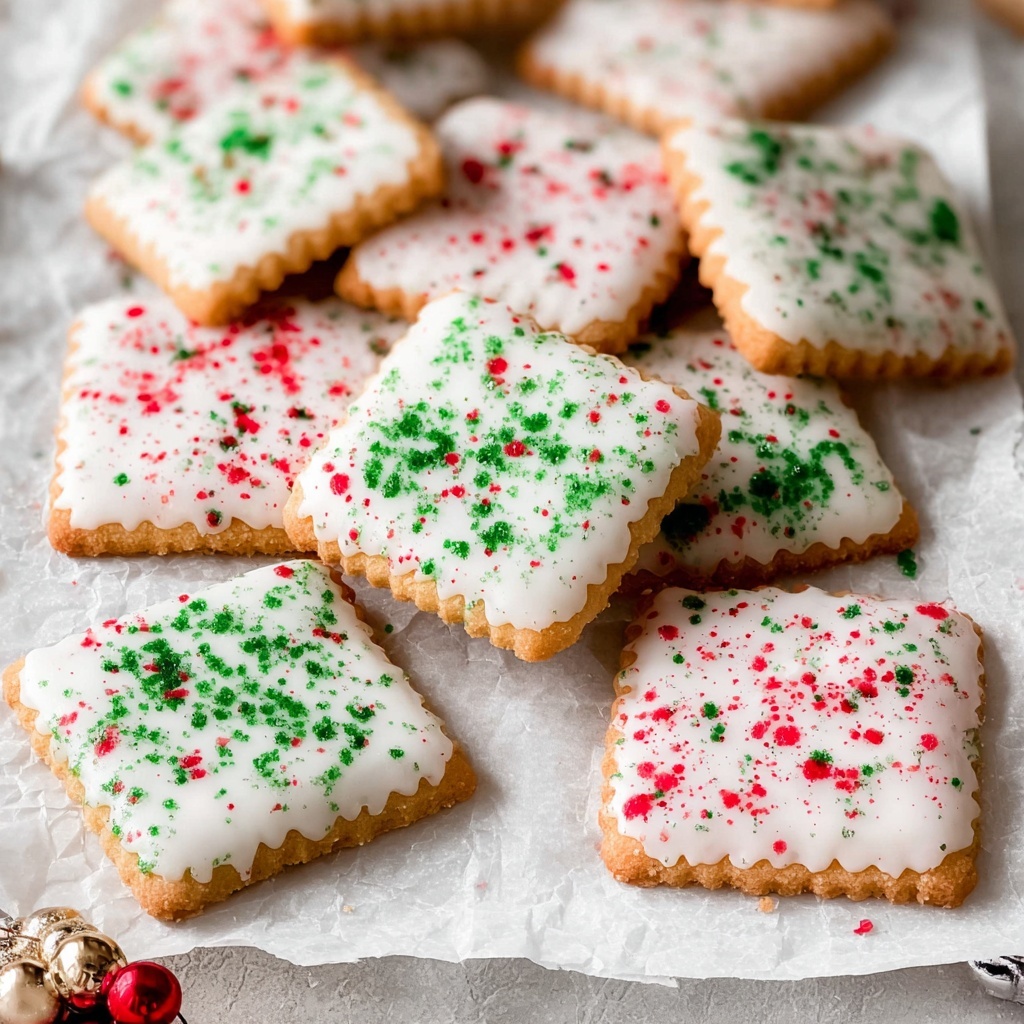
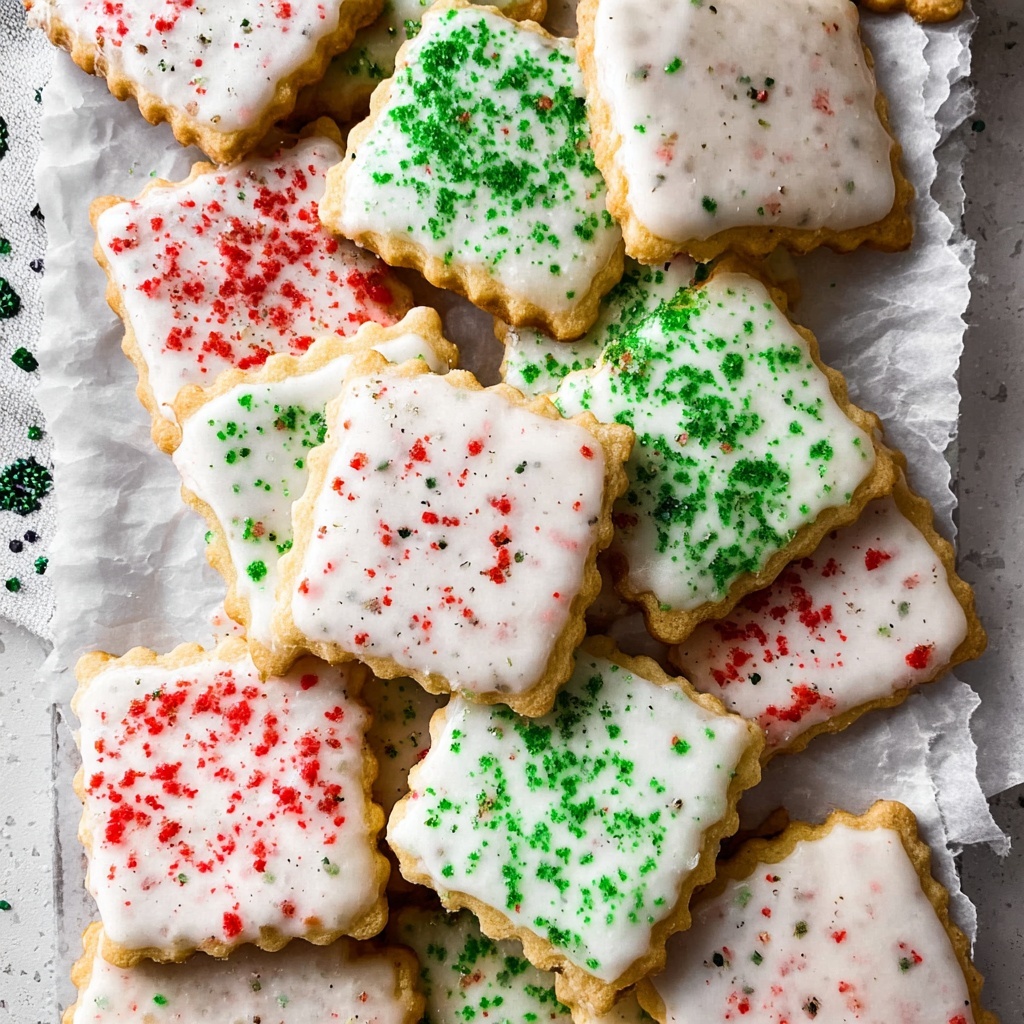
If you love festive treats with a playful twist, the Splatter Paint Christmas Cookies Recipe is here to dazzle your holiday dessert table! These charming sugar cookies combine a buttery, tender base with a vibrant and artistic paint-splatter icing that turns each cookie into a miniature canvas. The colorful splashes of red, green, and white make these cookies impossible to resist — perfect for gatherings, gifting, or simply brightening your winter days with edible art.
Ingredients You’ll Need
This recipe calls for simple kitchen staples that pack maximum flavor and texture. Each ingredient plays a vital role, from creating the soft cookie base to crafting the eye-catching icing that sets this recipe apart.
- Unsalted butter: Provides a rich, creamy foundation that ensures tender, flavorful cookies without adding extra saltiness.
- Granulated sugar: Adds just the right amount of sweetness and helps achieve the perfect cookie texture.
- Large egg: Binds the dough together and contributes to the cookies’ softness and structure.
- Pure vanilla extract: Brings depth and warm aroma to the dough, creating a classic holiday scent.
- Almond extract: A subtle nutty note that complements the vanilla and elevates the flavor complexity.
- All-purpose flour: The backbone of the cookie, providing structure while keeping the cookies light and tender.
- Kosher salt and coarse sea salt: Balances sweetness and enhances all the rich flavors.
- Light corn syrup: Adds a soft chewiness to the cookies and helps the icing set with a glossy finish.
- Cold water: Used to thin the icing to the perfect consistency for splattering.
- Powdered sugar: The base for the vibrant, smooth icing that will turn your cookies into colorful masterpieces.
- Food coloring: White, red, and green shades create that festive splatter effect essential for this fun holiday look.
- Extra water or vodka: For thinning the icing and creating those perfect paint splatters with the right texture and drying time.
How to Make Splatter Paint Christmas Cookies Recipe
Step 1: Prepare the Cookie Dough
Start by creaming together the unsalted butter and granulated sugar until light and fluffy. This step is key for creating cookies that will melt in your mouth. Then, mix in the lightly beaten egg along with the vanilla and almond extracts for that signature flavor. Slowly incorporate the flour and salts, combining them just until the dough comes together. Be careful not to overmix; you want tender cookies, not tough ones. Chill the dough for at least an hour to make it easier to roll out later.
Step 2: Roll and Bake
Once your dough has chilled, roll it out evenly to about 1/4 inch thickness. Use a 2-inch cookie cutter to cut out perfect rounds — this size is just right for showcasing the splatter paint design. Lay the cookies on parchment-lined baking sheets and bake at 350°F (175°C) for about 12 minutes, or until the edges just start to turn golden. Let them cool completely before moving on to the decorating phase.
Step 3: Mix the Icing and Create the Splatter Paint Effect
While the cookies cool, prepare your royal icing by combining powdered sugar, light corn syrup, cold water, and vanilla extract. Divide the icing into three bowls, tinting them white, red, and green with your food coloring. To create that iconic splatter pattern, dilute the colored icings slightly with water or vodka so they’re thin but still vibrant. Using a brush or a small spoon, flick the colored icings onto the white base layer of icing on each cookie. Don’t be afraid to get a little messy — the beauty of this recipe is in the randomness and fun of each splash!
How to Serve Splatter Paint Christmas Cookies Recipe

Garnishes
While the splattered icing steals the spotlight, you can add little festive touches like edible glitter or small sugar snowflakes to kick these cookies up a notch. A light dusting of finely chopped pistachios can also add a surprising crunch and a fresh green pop that complements the painted design beautifully.
Side Dishes
These cookies pair excellently with warm drinks like spiced cocoa, chai tea, or a classic peppermint mocha. For a crowd, serve alongside a platter of fresh fruit and other holiday sweets to create a colorful and inviting dessert spread.
Creative Ways to Present
For gifting, layer the cookies carefully in a decorative tin or box with parchment sheets in between each layer to protect the icing. You can also stack a small tower on pretty plates wrapped in cellophane tied with festive ribbons — these vibrant cookies double as charming holiday decorations!
Make Ahead and Storage
Storing Leftovers
You can keep your Splatter Paint Christmas Cookies fresh for up to a week by storing them in an airtight container at room temperature. Make sure the icing has hardened fully before stacking to prevent any smudging.
Freezing
To freeze these festive treats, place them in a single layer on a baking sheet until solid, then transfer to a freezer-safe container with parchment paper between layers. They freeze beautifully for up to three months — just thaw at room temperature before serving.
Reheating
Since these cookies are best enjoyed as is, avoid microwaving or heating. If you want a fresh-baked warmth, try pairing them with a hot beverage instead while enjoying the cool icing contrast.
FAQs
Can I use different colors for the splatter?
Absolutely! While red, green, and white scream Christmas, feel free to get creative with any colors you love to match other occasions or personal styles.
Is there a substitute for corn syrup in the icing?
You can substitute light corn syrup with honey or golden syrup, but be aware it may slightly alter the flavor and glossiness of the icing.
How do I prevent the splatter icing from mixing colors?
Make sure to let the base white layer dry thoroughly before splattering the colored icings. Using thinner icing and flicking gently helps keep colors distinct and vibrant.
Can I make these cookies gluten-free?
Yes, by substituting all-purpose flour with a gluten-free blend designed for baking, though texture might vary slightly. Always check your flour blend for xanthan gum content for best results.
Why is vodka recommended to thin the icing?
Vodka evaporates quickly and doesn’t add extra water weight, which helps maintain the icing’s hardening properties while allowing you to get that perfect paint splatter consistency.
Final Thoughts
There is something incredibly joyful about turning cookie decorating into a colorful experiment with the Splatter Paint Christmas Cookies Recipe. These cookies bring artistic fun and classic festive flavors onto your holiday table, guaranteed to impress friends and family alike. Why not grab some food coloring, gather your loved ones, and create your own edible masterpieces that taste as good as they look? Happy baking and happy holidays!